Overview
This document guides you on creating and managing custom service products and add-ons.
It covers the steps to set up new products, configure their details, and manage them over time.
Products are individual items used to create subscriptions, which define the subscription duration, payment frequency, billing settings and other inherited configurations.
Products
When creating a subscription in Cloudmore a product with an SKU/item code needs to be selected. If there are many products, the products can be divided into groups to make it easier for the user to find the right product.
Products may also have add-ons that can be bought together with the main product. For some services, the add-ons can also be used to select a variation of the main product. In these cases, the product price is zero, and instead, the price is based on the selected add-on.
For consumption-based services, it is also possible to create hidden add-ons. The add-ons are not exposed to the user when the subscription is being created but are used for pricing and billing.
Important Terminology
-
Recurring Billing: These types of products are generating billing for the customers at regular intervals, such as monthly or annually, until they are cancelled.
-
License-Based Products: These recurring billing products are billed based on an integer number of licenses purchased. Billing is generated up front. Read more about License-based Products.
-
Consumption-Based Products: These recurring billing products are billed based on their actual usage rather than a fixed rate. Here, the user won’t specify a quantity when the subscription is created, rather the quantity is submitted at the end of the billing period. Read more about Consumption-based Products.
-
-
One-Time Billing: It refers to a single, non-recurring charge for the subscription. Read more about One-Time Purchases.
Steps Involved in Adding Products to a Service
-
Log in to your Seller account.
-
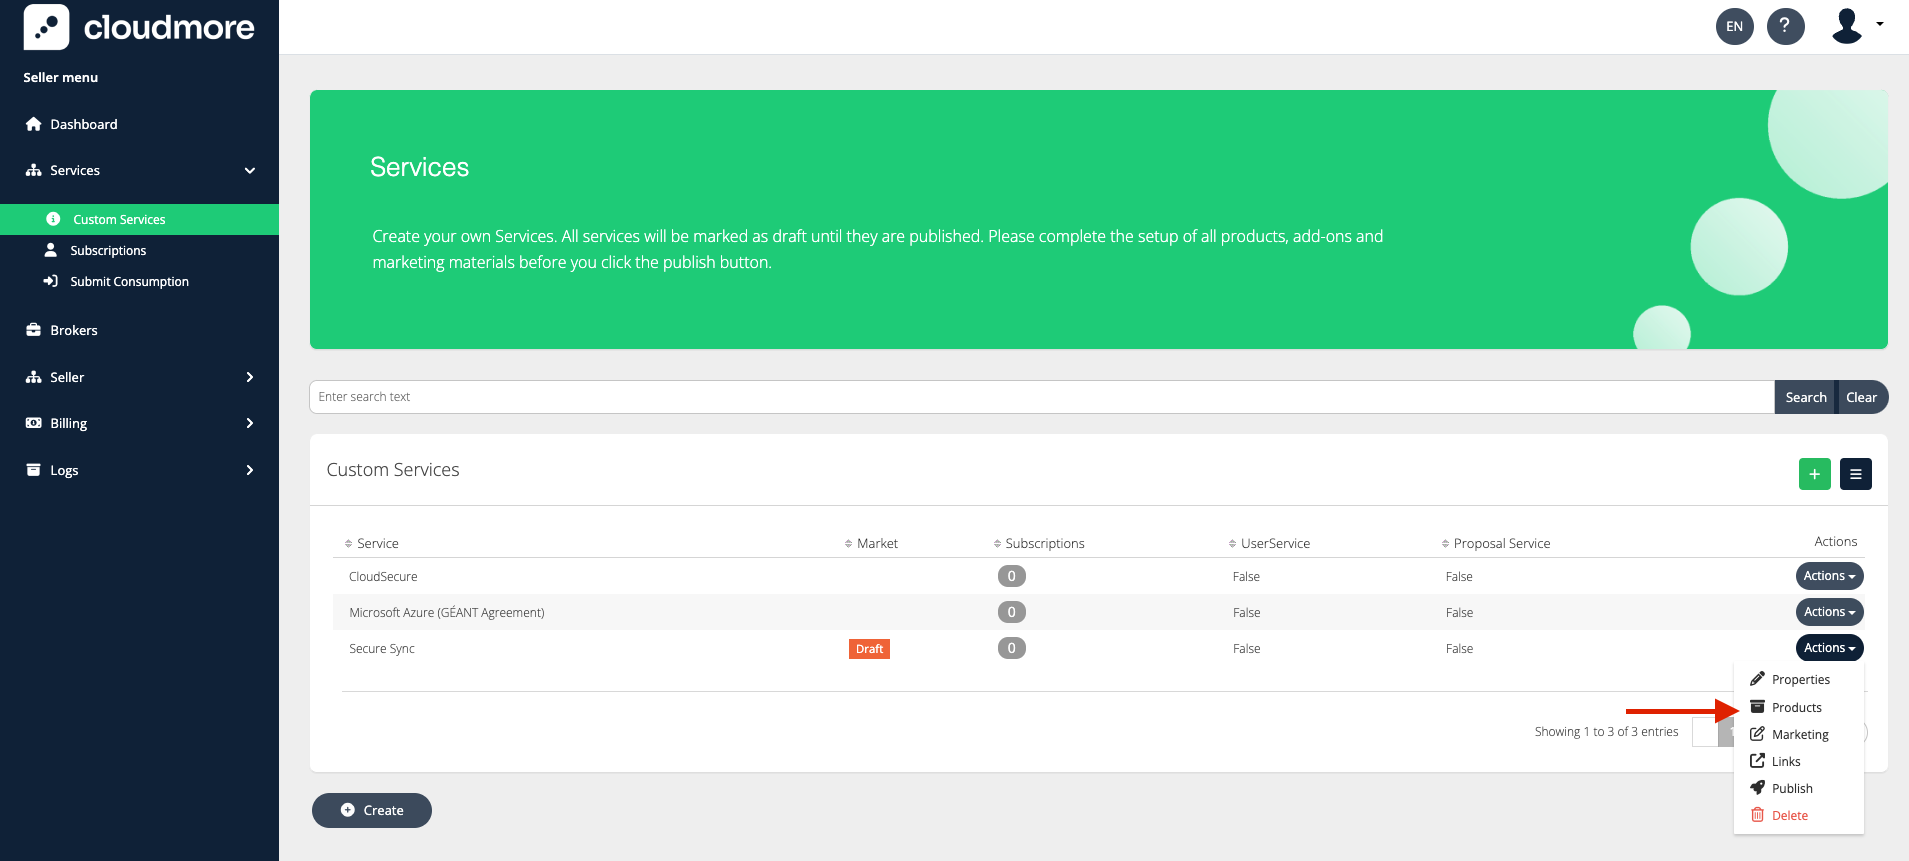
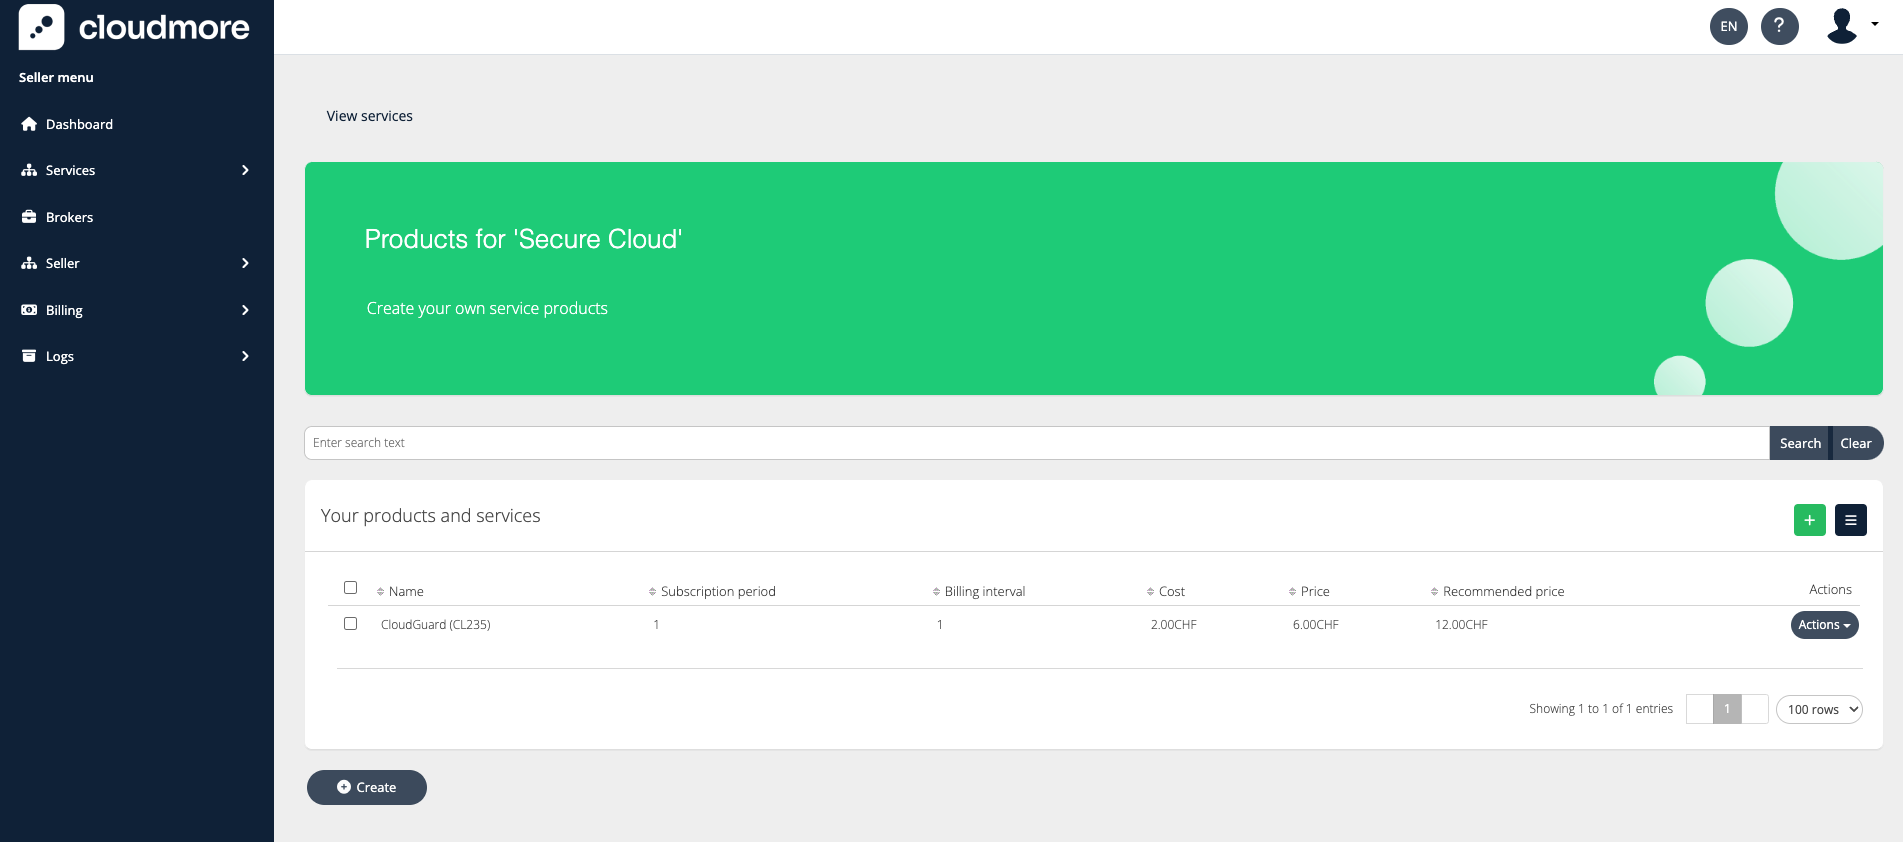
Navigate to Services > Custom Services
-
Click on Actions and then Products.
-
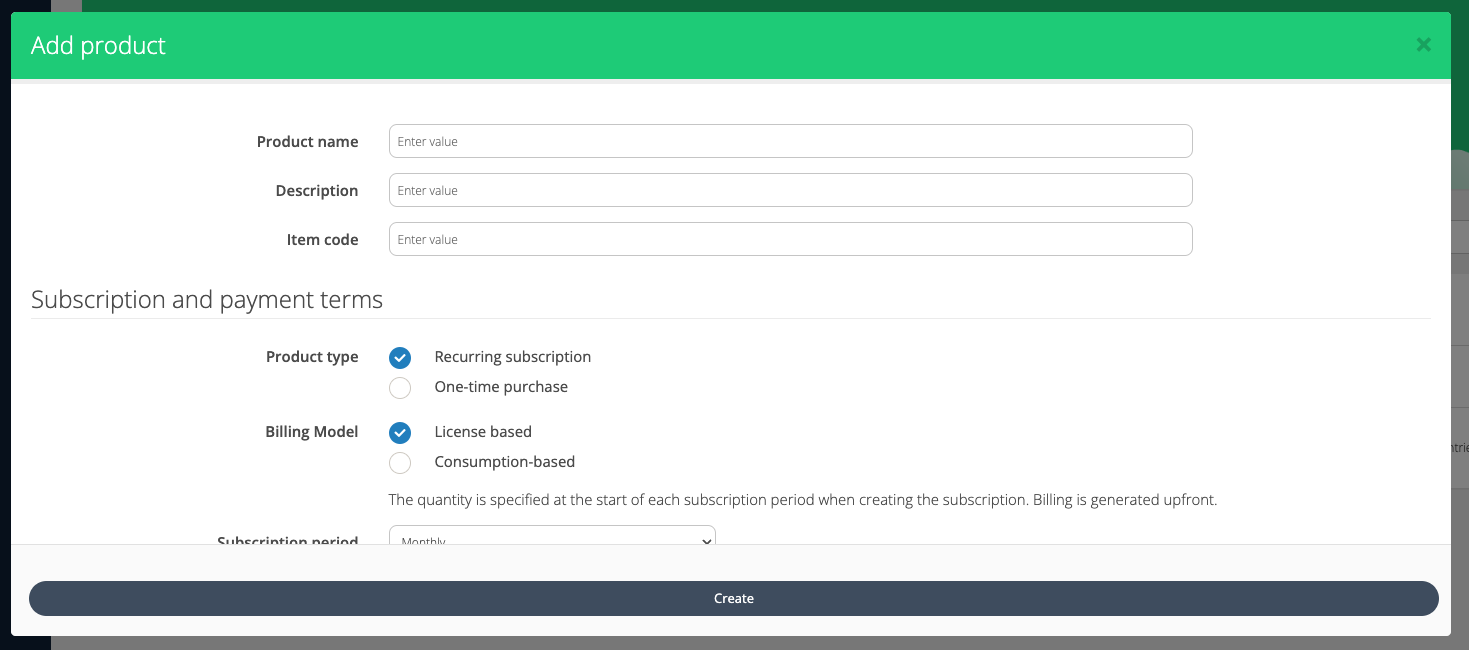
Enter the fields that describe the product. It is here where the product is distinguished as a recurring or one-time purchase and then subsequently a license-based or consumption-based.
Key fields in Product setup
-
Product Name: Provide a clear and distinguishable description of the product.
-
Description: Offer a detailed product description to help the end-user understand its features and benefits.
-
Item Code: Assign a unique identifier for the product.
-
Product Type: Choose between a Recurring Subscription or a One-Time Purchase.
-
Billing Model: If the product type is Recurring, choose between the License-based or Consumption-based model.
-
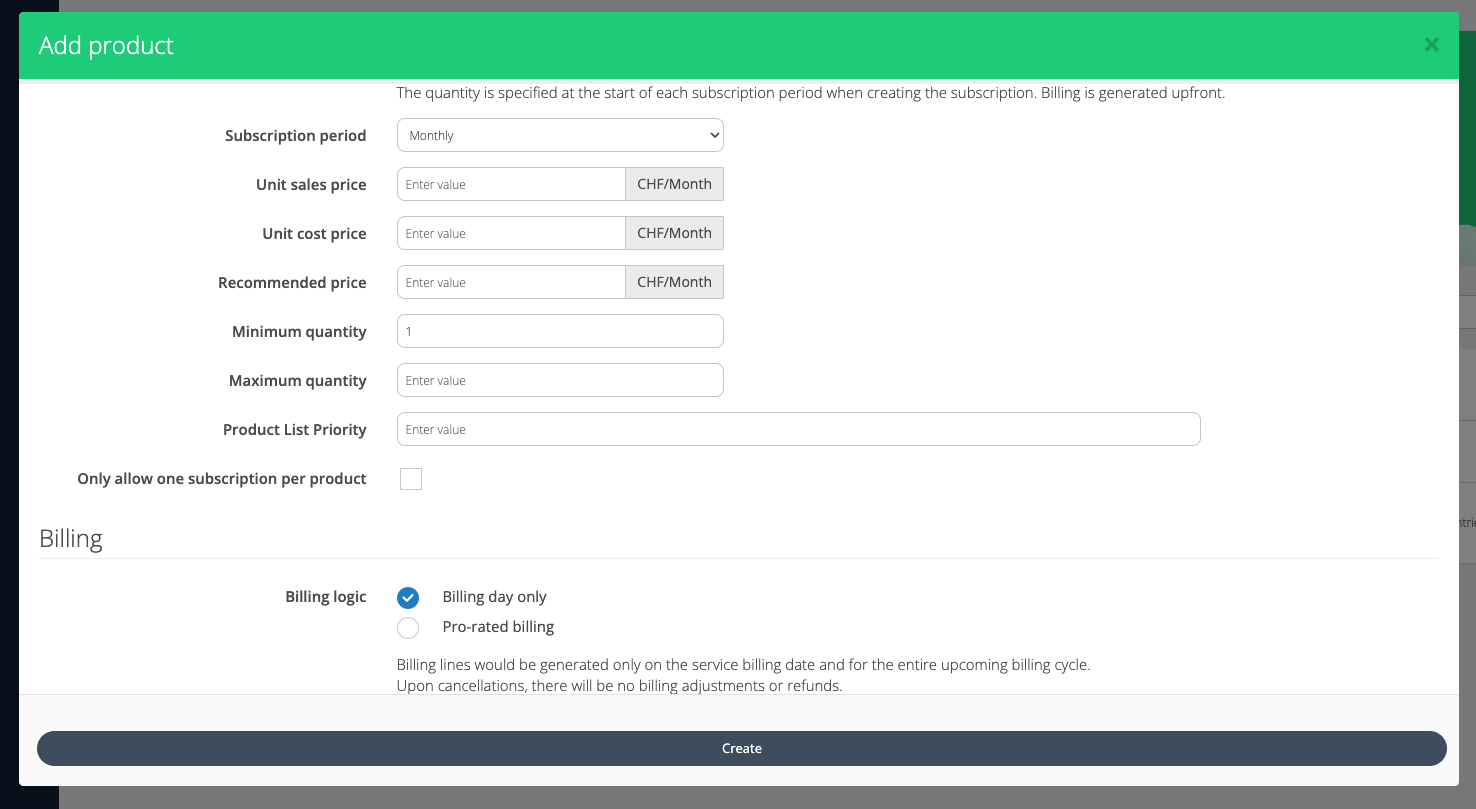
Subscription Period: Specify the subscription duration, at which the subscription will renew. This can only be set for recurring billing products.
-
Unit Cost Price: The initial cost price for the product.
-
Unit Sales Price: The initial sales price. Admins have the option to adjust this if needed.
-
Recommended Price: The default sales price of the product when Broker sets no other sales price.
-
Minimum Quantity: The lowest possible license quantity or consumption the subscription can have.
-
Maximum Quantity: The highest possible license quantity or consumption the subscription can have
-
Product List Priority: Determine the position of the product within the service's product list.
-
Only allow one subscription per product: When it is selected, each Organization can create only one subscription under that service.
-
Billing:
-
Billing Logic: The overarching logic as to how the billing will be generated.
-
Billing Day Only: Billing lines would be generated only on the service billing date and for the entire upcoming billing cycle.
-
Pro-rate Billing: Billing lines would be generated depending on the number of days the subscription or add-on was active. This also means that if licenses or add-ons are added mid-period, then proportional billing will be generated for these additional licenses. Similarly, refunds are issued when licenses are decreased or add-ons disabled.
-
-
First Billing Period: The overarching billing logic as to how the billing for the initial partial period when the subscription is created.
-
No Billing: No billing will be generated for the first partial cycle, and enabling add-ons will not create any charges. Essentially treating the initial period as a “grace period”.
-
Pro-rated Billing: Billing will be generated proportionally for the number of days the subscription or add-on was active during the first partial cycle.
-
Full Cycle Billing: Billing will be generated for the entire billing cycle during the first partial cycle, and enabling additional add-ons. Billing will be generated for the entire cycle, regardless of how few days it was active before the first service billing day.
-
-
-
Renewals and cancellations: Define the actions to be taken when the subscription is up for renewal and when it is canceled.
-
Notifications for days left: Configure the notification to alert users about the number of days remaining before the subscription expires.
-
Expiry notification: Configure the notification to alert users after the subscription has expired.
-
Welcome message: Configured welcome messages, i.e. send notifications when an organization adds a subscription.
-
Trial management: Offer a trial period for the subscription, which acts as an X days where billing for a subscription will not be generated.
-
Custom Properties: Custom Properties allows you to create custom fields. These custom fields can collect additional data about the subscription when it’s created.
-
Once the fields are filled, click on Create.
Product Add-Ons
Product add-ons are additional features that can be attached to a main product to enhance its value or functionality. Product add-ons can be added only after the products are added to a service.
Steps Involved In Creating a Product Add-On
-
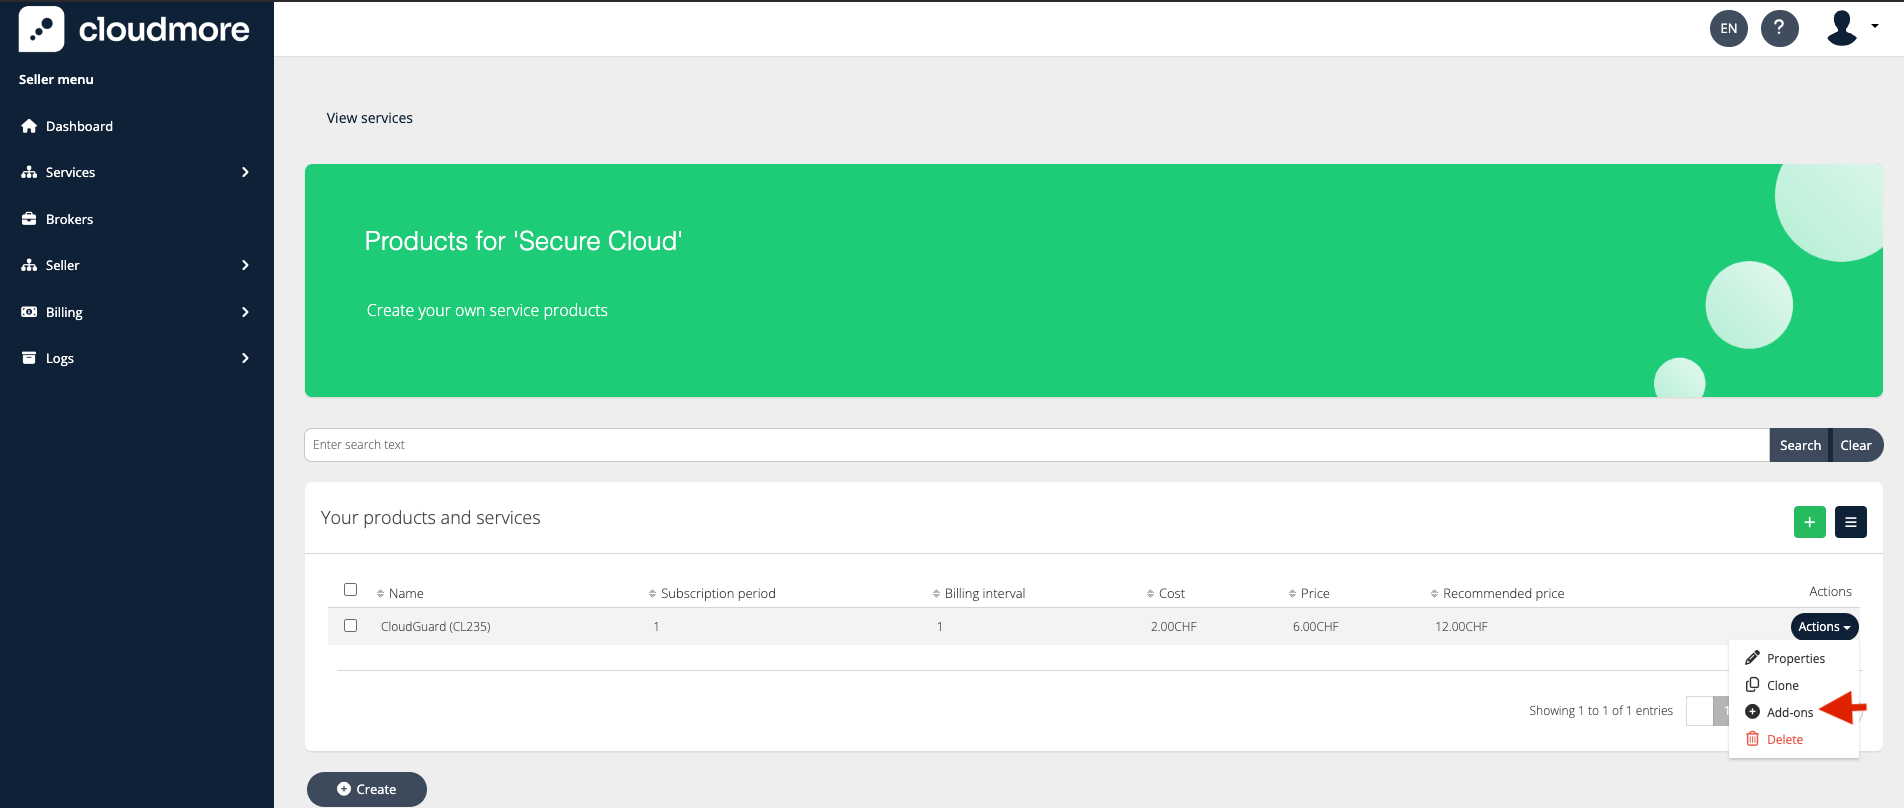
Navigate to the products Services > Custom Services > Action > Products
-
Click on Actions > Add-ons.
-
Click on Create to create a new add-on for a product.

-
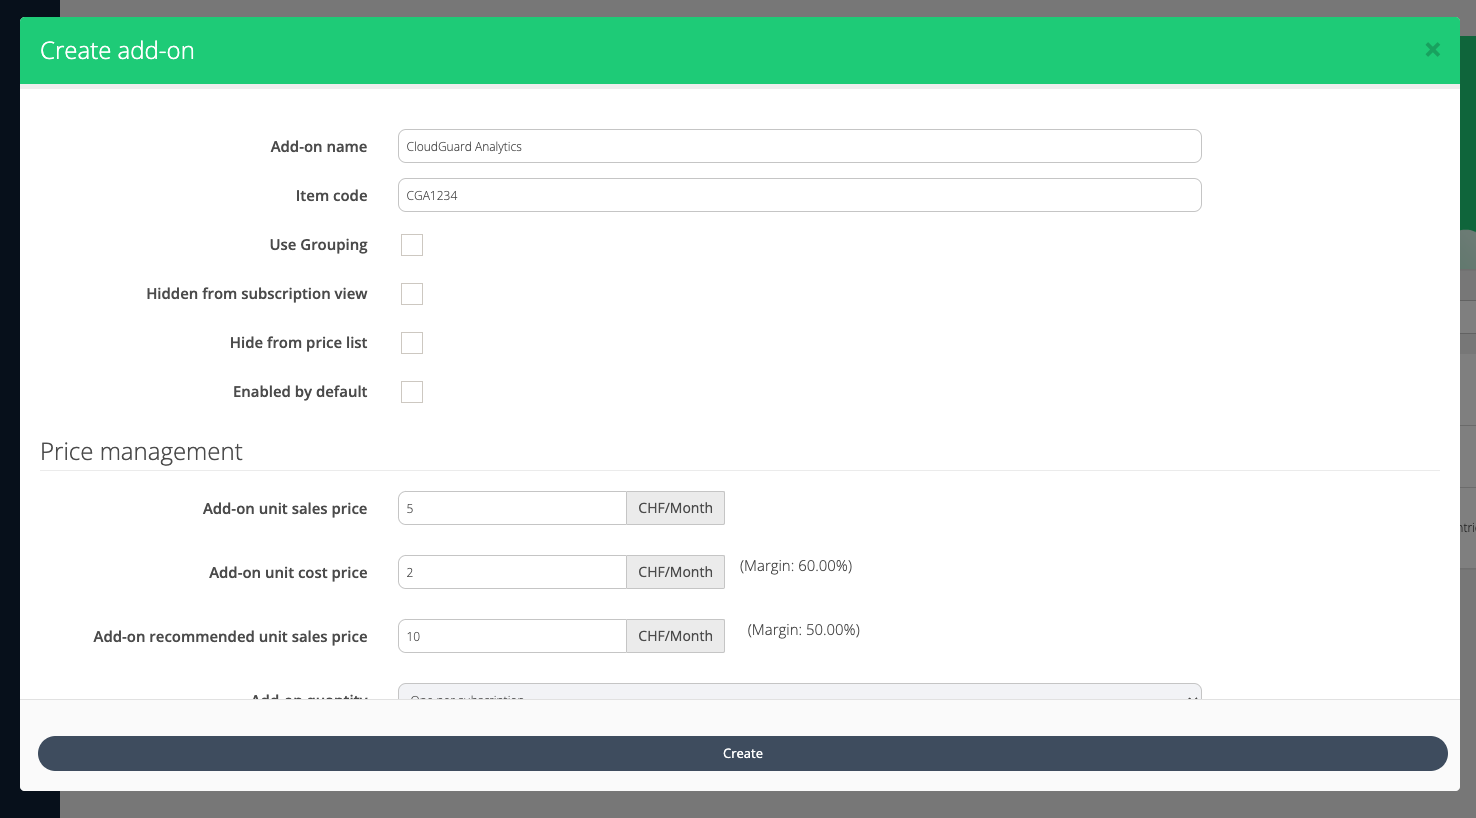
Enter the fields that describe the product add-on.
Key fields for Product Add-ons
-
Add-on Name: The name of the add-on how it will be displayed to the end user.
-
Item Code: A unique item code to identify this add-on.
-
Use Grouping: Select grouping to make it so that only one add-on from each group can be chosen.
-
Hidden from subscription view: Make the add-on not visible when creating or editing a subscription. Use this when you don’t want to give the Organization user a chance to enable or disable (or even see) this option.
-
Hidden from price list: Make this add-on not be visible in the Broker and Organization level price lists.
-
Enabled By Default: Makes the add-on Enable = checked by default when creating a subscription.
-
Add-on Unit Cost Price: The initial unit cost price for the add-on.
-
Add-on Unit Sales Price: The initial unit sales price for the add-on.
-
Add-on Recommended Unit Sales Price: The default sales price of the add-on when Broker sets no other sales price.
-
Add-on Quantity: Limit the number of product add-ons that can be added.
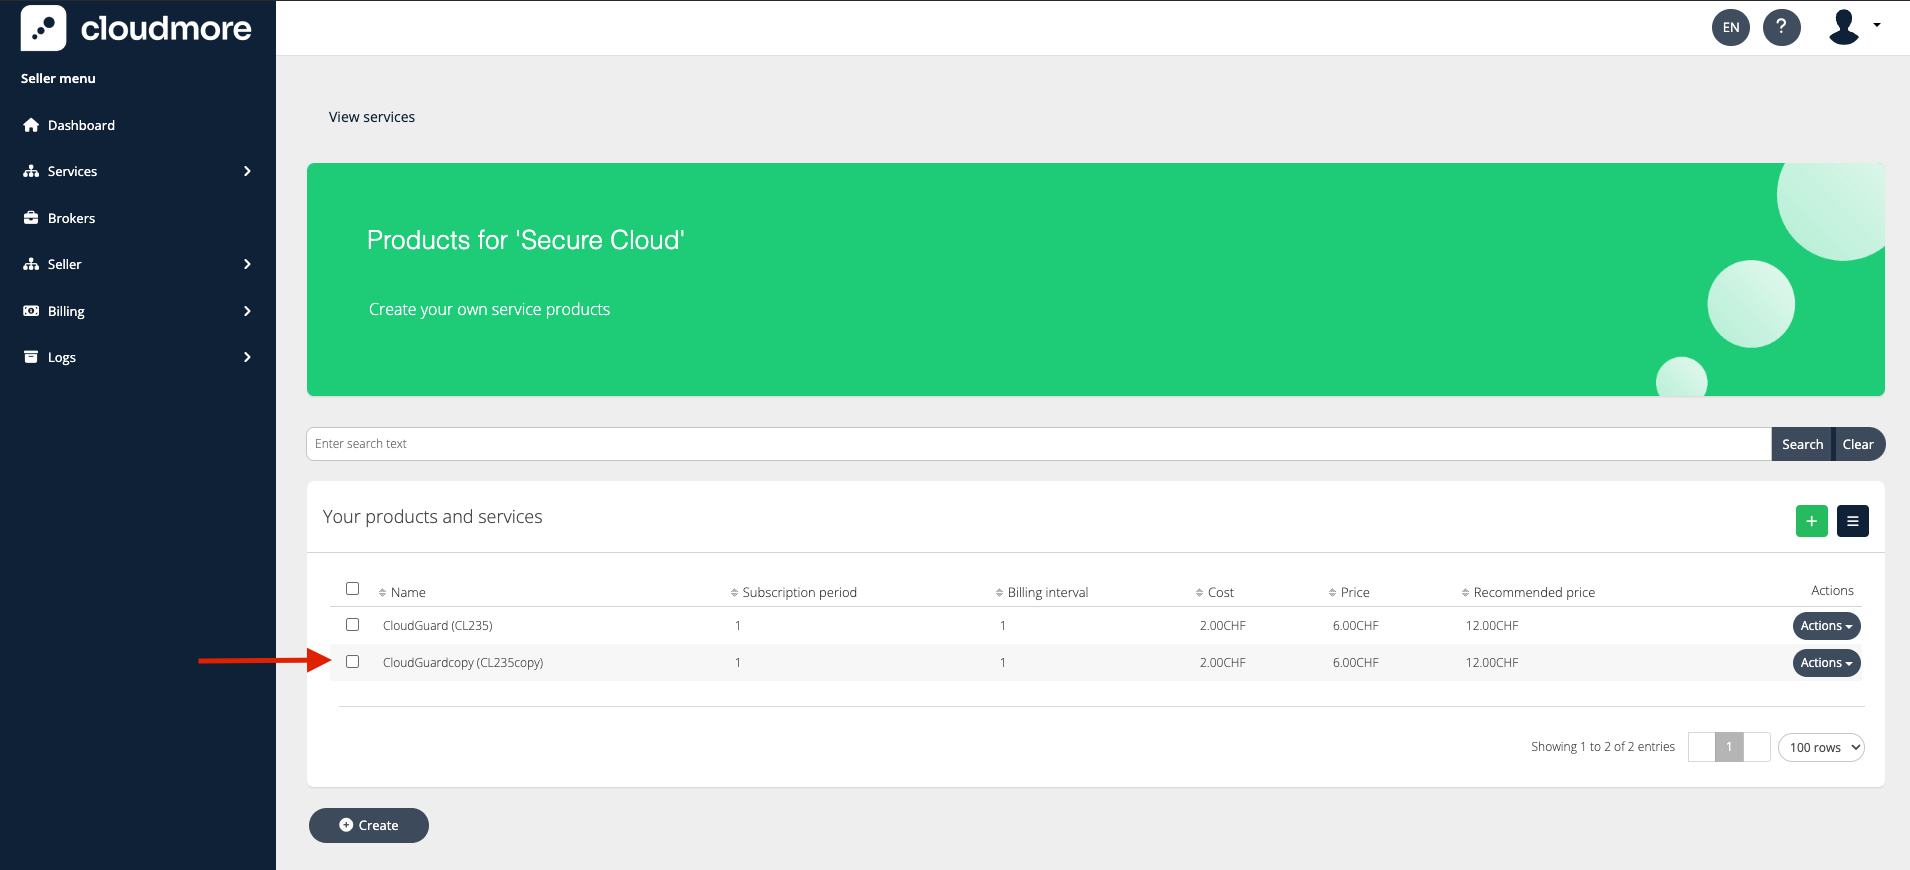
Product Cloning
Cloning products enables you to add different product options by replicating an existing product quickly. This will copy everything, including custom fields and add-ons.
Keep in mind that essentially the same product with different payment frequency or different subscription period is treated as a separate product.
After the 1st product is set up, all that needs to be done is clone it and make a few changes. For example, to make an annual version of the same product.
Steps Involved in Cloning a Product
-
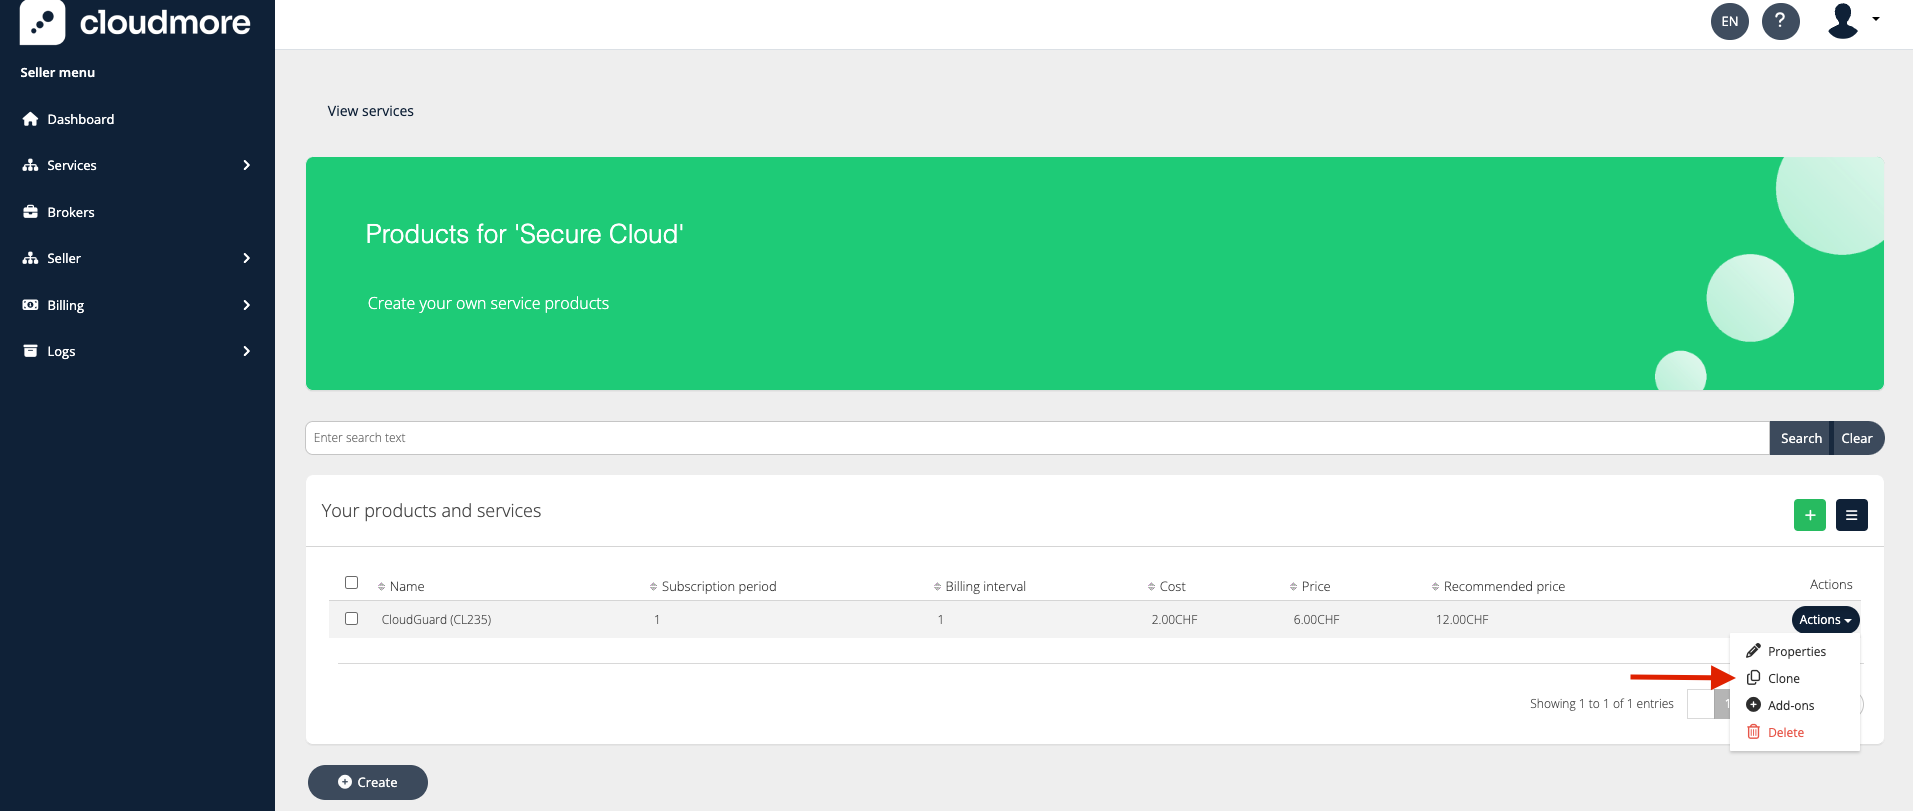
Navigate to Services > Custom Services > Action > Products
-
Click on Action > Clone.
-
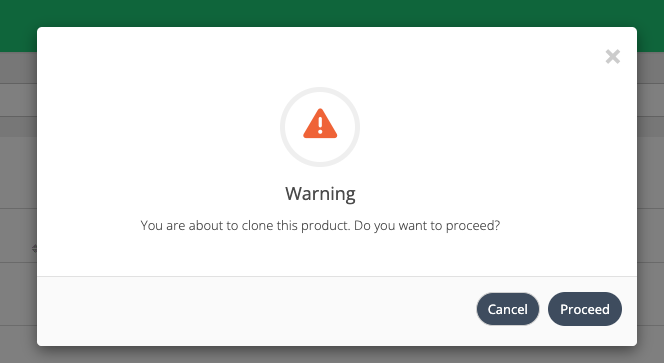
Click on Proceed.
-
The cloned product appears on the product view. Click on Actions > Properties to edit the product and make the necessary changes.

Once your entire product portfolio is create, along with add-ons you can proceed to Publish the service.