Overview
This document explains how to create, update, and manage organizations in Cloudmore.
In Cloudmore, customers are referred to as organizations, and the organization record is a core part of your setup because it connects customer data, subscriptions, billing, and services.
Organizations and Microsoft tenants are linked in a 1-to-1 relationship, which gives you a clear and reliable structure for managing each customer in Cloudmore.
You can create Organizations using the Microsoft tenant import.
Auto-creating organizations by tenant import helps keep the data synced and manageable through Organizations in Cloudmore.
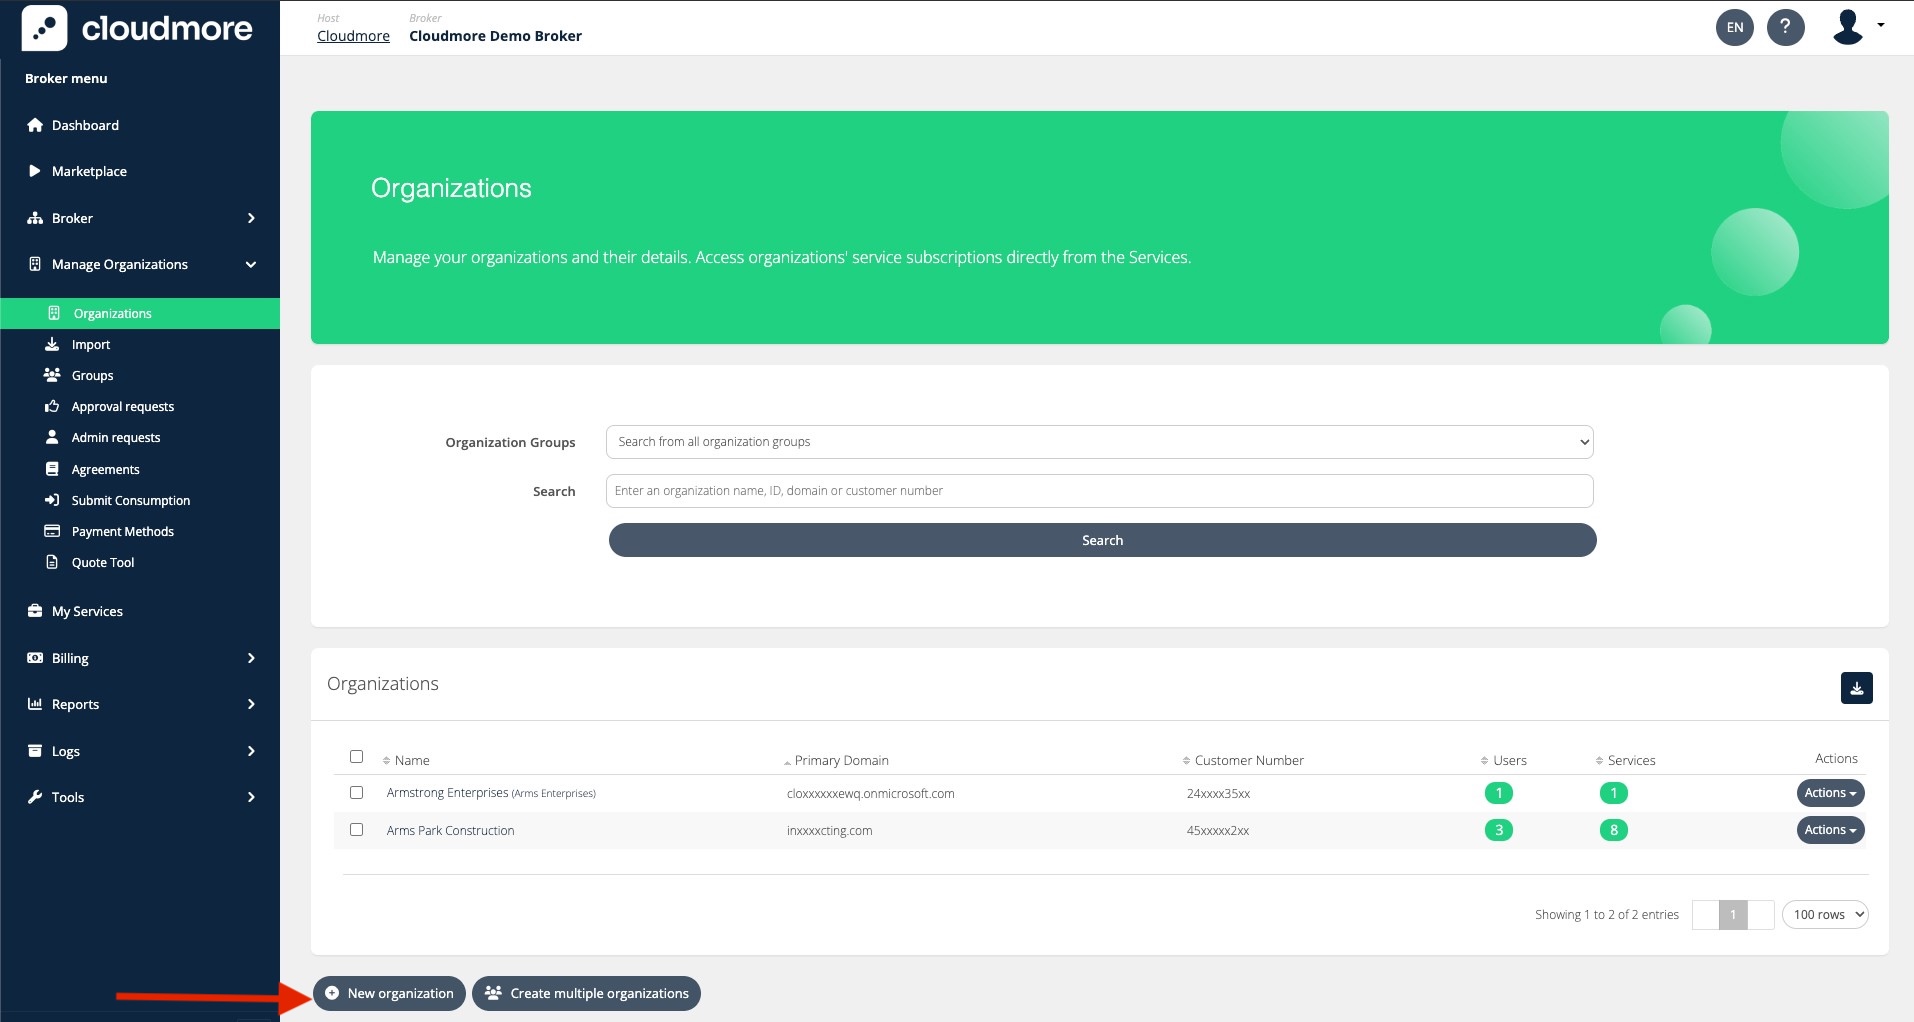
Organizations List and Search
This is the main table where all your customers are shown.
Important Organization fields
-
Name - The Organization’s name (your customer’s name)
-
Primary domain - The primary domain name utilized by the customer.
Exclude HTTP or www.
You can search for Organizations using this field.
-
Registration number - Company ID or tax ID
If you do not have this, you can leave this field empty.
-
Notification email - Email address where Cloudmore notifications for the customer should be sent.
-
Customer number - Your customer reference number. This number appears on data exports and API calls, serving as the unique identifier for the customer.
You can search for Organizations using this field.
-
Organization ID - This is the unique identifier generated by Cloudmore.
You can search for Organizations using this field.
-
(Organization custom properties) - A property that is defined by you as the Broker. These custom property definitions apply to all of your customers. Think of them as extra custom fields. The value for each Organization is also defined by you.
The Organization Custom Properties are not mandatory. They can be used to add additional custom information about each of your customer.
You can search for Organizations by using Name, Primary Domain, Customer Number, and Organization ID.
Steps to Import and Create Organizations
Bulk Import Organizations
You can import organizations by either uploading a file or manually entering the information.
Navigate to Manage Organizations> Organizations to Create multiple organizations.
Method 1: Bulk Import Organizations from Microsoft
You can create an organization from the CSP tenant. Using this method, Cloudmore Organizations can be automatically created based on Microsoft Tenants. This streamlines the process, ensuring that all relevant organizations are efficiently imported and set up within the Cloudmore Platform.
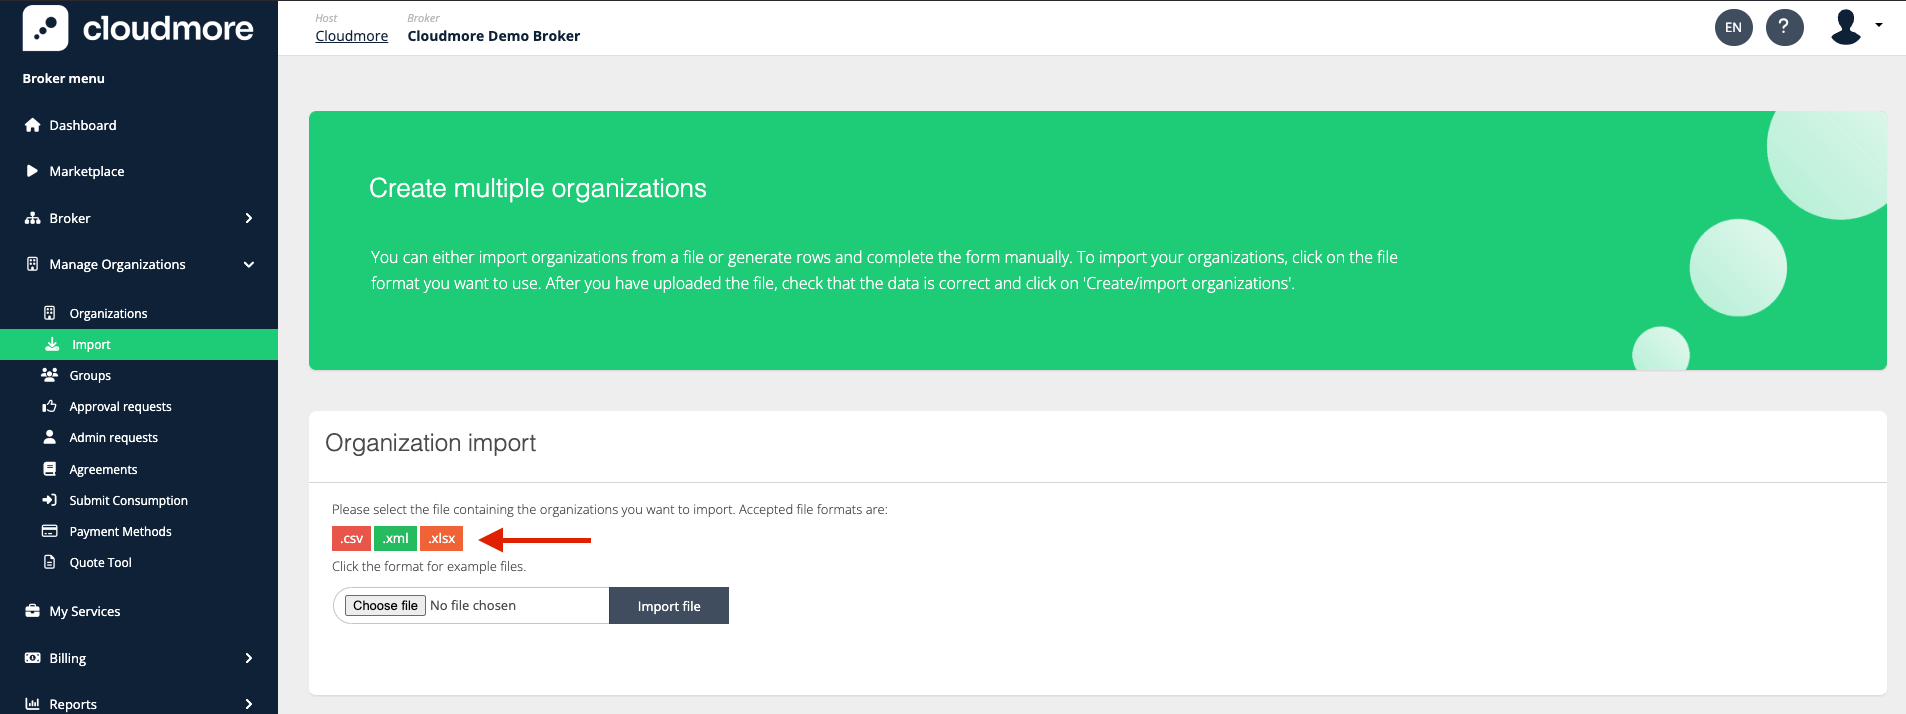
Method 2: Bulk Import Organizations by Uploading a CSV File
-
Click on the preferred file format to download the template. Use this template to ensure the correct format is maintained when uploading your file.
-
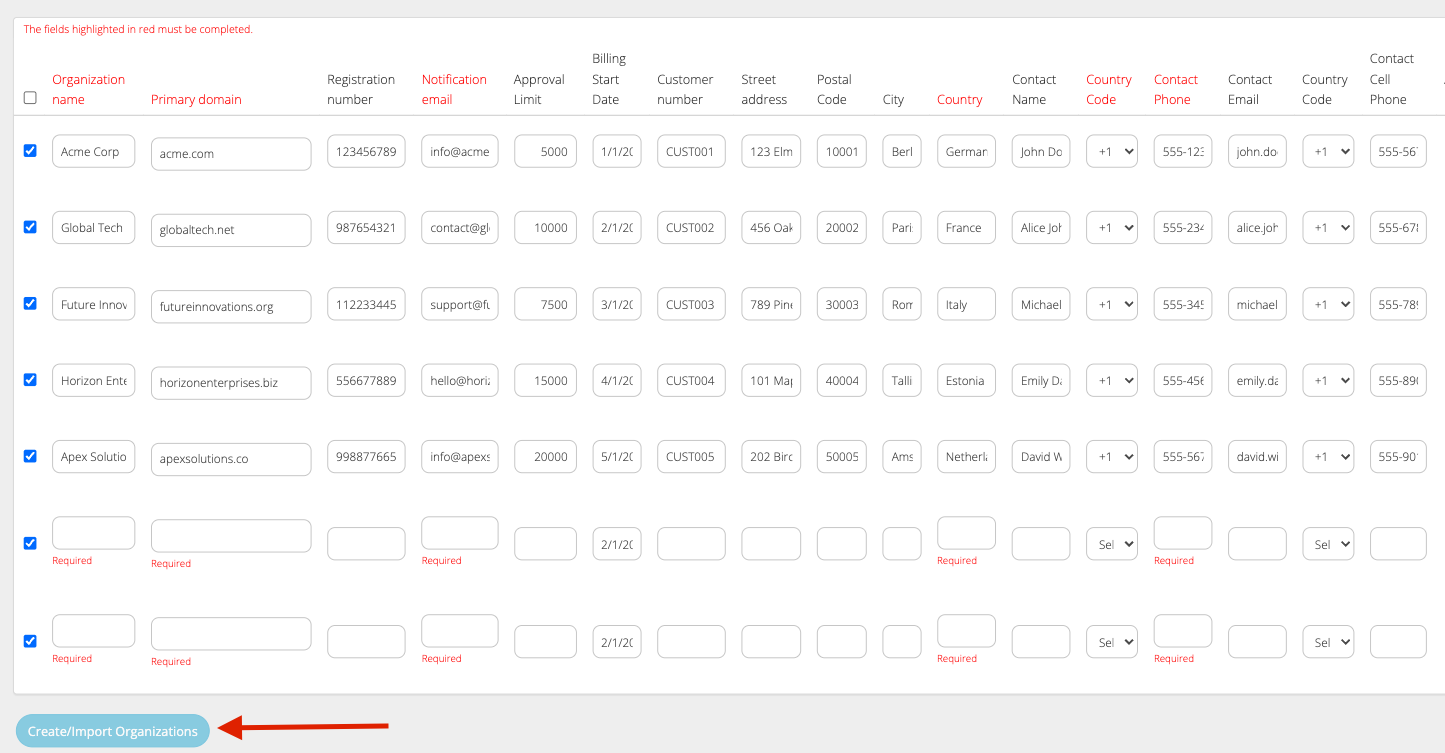
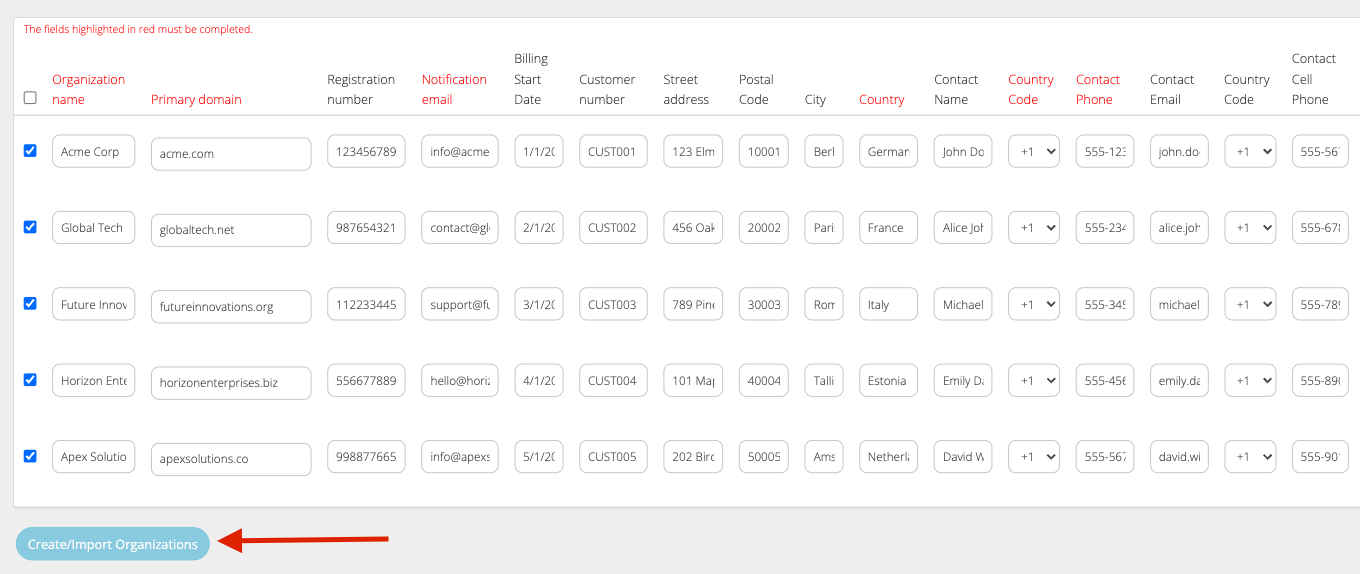
Fill in the information in the downloaded file and upload it to complete the import process.

Note: The fields highlighted in red (Name, PrimaryDomain, NotificationEmail, Country, PhonePrefix, ContactPhone) are mandatory
-
Once you upload the template file and click on Import, the entries will be displayed on the screen for you to verify.
-
Once all the information is verified, click on Create/Import Organizations
Method 3: Bulk Import Organizations Using the Multiple Organizations Form
-
Click the dropdown and choose how many organizations you want to create. Click on 'Generate Rows'.
-
Fill in the rows with the organization’s information in the form that appears below.
-
When the form is completed, click 'Create/Import Organizations'.
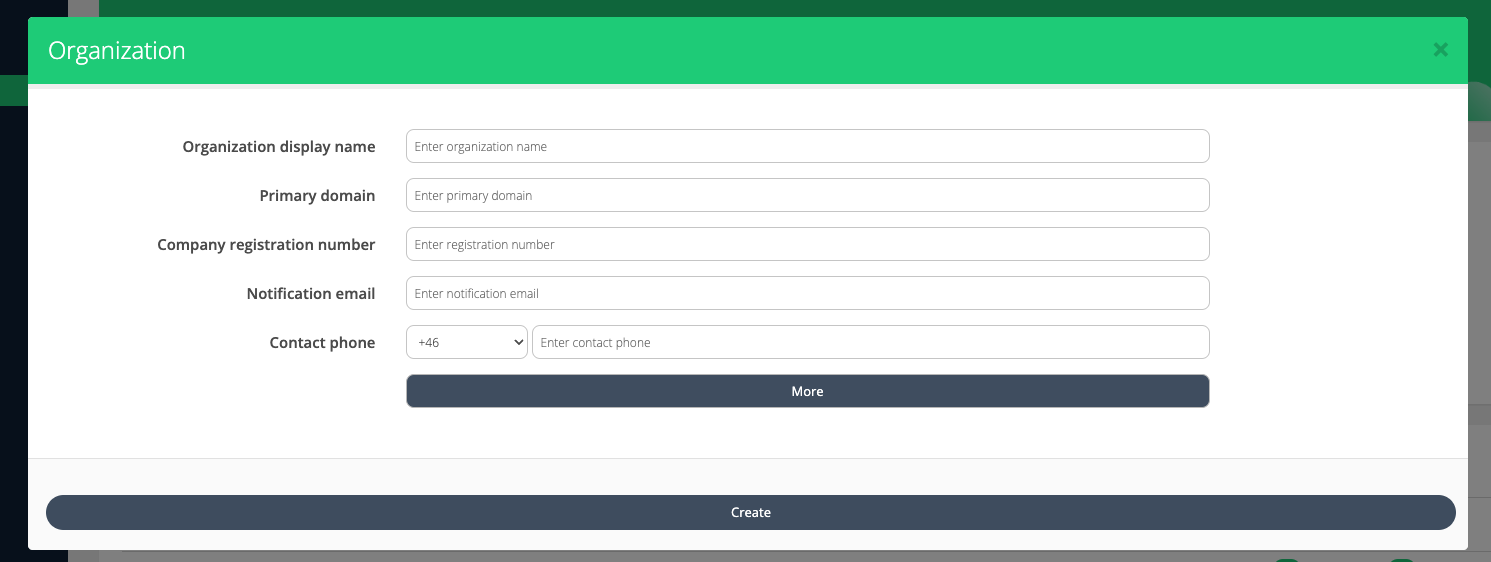
Method 4: Add Organizations Individually
-
Navigate to Manage Organizations > Organizations.
-
Click on New Organization.
-
Complete the required fields and then select Create. To add more organization details, click More.
Approval settings for new Organizations
For any new Organizations created, the default approval process settings will be applied.
Read more about approval process settings
Export Organizations
To export the organization list, click the download icon and select the preferred file format.

Organization Export on Broker Level
|
Roles → |
Broker Admin roles |
Key Account Manager roles |
Sales Agent role |
|---|---|---|---|
|
Organizations included →
|
All organizations |
Organizations from the assigned Organization Groups |
Organizations from the assigned Organization Groups |
|
Name |
|
|
|
|
DisplayName |
|
|
|
|
Services |
|
|
|
|
Users |
|
|
|
|
Domains |
|
|
|
|
RegistrationNumber |
|
|
|
|
CustomerNumber |
|
|
|
|
Contact |
|
|
|
|
eId |
|
|
|
|
HomePage |
|
|
|
|
NotificationEmail |
|
|
|
|
Vat |
|
|
|
|
Street |
|
|
|
|
PostalCode |
|
|
|
|
City |
|
|
|
|
State |
|
|
|
|
CountryRef |
|
|
|
|
BillingStartDate |
|
|
|
|
(organization custom properties) |
|
|
|
As a broker, You have to create the first Organization User, so each customer would be the first user who can access the platform and create more users for their colleagues.